Multiple Firebase Environments in iOS
Introduction
The
Firebase suite of products is great for getting basic mobile backend
services up and running quickly. One of the most common Firebase
services is Google Analytics for Firebase, which allows you to setup and
track actions that users are performing in your app. The deeper you
invest in setup of analytics events, the more accurately you can start
to understand user behavior and react appropriately. Sometimes, this
might mean making business-critical decisions based on this information,
which makes the accuracy of said information of upmost importance. In
this post, we’ll talk about the potential negative consequences of
failing to prevent this “data pollution”. Then, we’ll go through the
process of setting up your Xcode project to enable separate Firebase
development and production environments.
Data Pollution
One
potential source of pollution to your analytics data could be from your
own QA process when developing and testing your app. If analytics data
capture is not suppressed during the testing process, then your testers
could be over-exaggerating certain user flows, giving you a false image
of how your actual users are actually using the app. Sure, you could
probably work around this by setting up some clever rules to try and
filter out the invalid data before analysis, but wouldn’t it be better
if the data never made it into your production environment in the first
place?
Another
source of pollution could live in the Firebase Analytics console
itself. During the development process, you may want to experiment with
setting up new funnels, audiences, or filters in response to the
creation of new analytics events or application features. In this case,
suppressing the analytics events would prevent you from being able to do
proper prep-work inside the console. You also don’t want to pollute
your production Firebase Analytics console with fragments and
configurations leftover from your development and testing process.
Separate Firebase Environments — Existing Solutions
Surprisingly,
setting up separate Firebase development and production environments
isn’t very well documented, and some popular techniques could have
unintended consequences.
One of the first results when you may come across when researching a solution involves creating two separate Firebase projects, which ultimately yields two separate GoogleService-Info.plist
files. It’s then recommended to bring these both into your Xcode
project, renaming the file that corresponds to your development Firebase
environment with a “-Dev” suffix. A compilation condition check is then
implemented in the code to manually start up the Firebase SDK with the
contents of the appropriate GoogleService-Info.plist file.
It’s important to note that this approach will
work. The Firebase iOS documentation even recommends it when setting up
a single app target to work with multiple Firebase environments.
However, the Firebase documentation
also warns developers that utilizing this approach can impact analytics
collection in some circumstances. This is due to the fact that the
Firebase SDK collects events very early in the application launch flow,
in some cases before the primary Firebase app instance has been
configured. In this scenario, the SDK uses the default name of the
configuration file — GoogleService-Info.plist — to
log these events. This means that the SDK could potentially be using
the wrong configuration file briefly before your code is given a chance
to configure the Firebase instance properly.
In
most cases, this drawback probably will not pose any issues to your
app. Firebase has explained the caveats to this approach in their documentation.
However, even if your app won’t be affected by the potential drawbacks,
you may want to go ahead and setup your project so that it removes the
risk of them ever potentially becoming an issue.
Separate Firebase Environments — An Alternate Approach
The
first few steps of the current approach to setting up separate
development and production Firebase environments are correct. To start
off, you’ll still want to:
1. Create two separate Projects (not Apps), configuring each one to use the Bundle ID for your app target in Xcode.

2. In the Firebase console, create an iOS App for each Firebase project.
3. In the Firebase console, download the GoogleService-Info.plist for each app, saving them to separate directories on your hard drive.

For this setup process, instead of renaming one of the files to GoogleServices-Info-Dev.plist, we’ll keep the name of the configuration files to their default of GoogleService-Info.plist.
This is to prevent us from having to manually configure the Firebase
SDK instance during the app launch process, which will prevent the
potential caveats with this approach from ever coming into the picture.
To keep the default names for the plist configuration files, we’ll need
to keep them in separate directories on the file system:
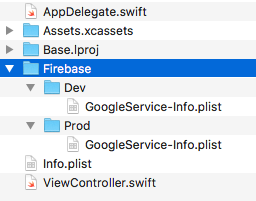
4. Inside of the directory corresponding to your app target’s code (usually the same directory that contains your AppDelegate.swift, Assets.xcassets, and Info.plist files), create a Firebase directory.
5. Inside of the Firebase directory, create Dev and Prod child directories.
6. Copy the GoogleService-Info.plist corresponding to your Firebase development environment into the Dev directory.
7. Copy the GoogleService-Info.plist corresponding to your Firebase production environment in the Prod directory.
This
next step is optional. If you’re like me, you appreciate it when an
Xcode project’s “Group” structure matches the folder structure on the
file system:
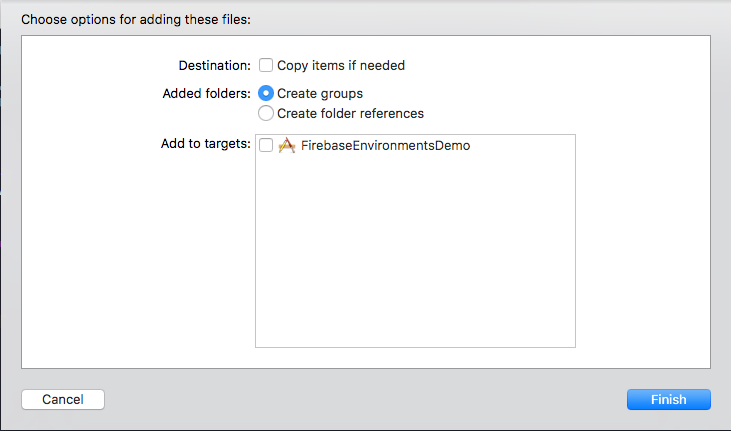
8. Add the Firebase folder to your Xcode project. Since this is the parent directory, it should automatically bring in the Dev and Prod child directories and their corresponding GoogleService-Info.plist files.
9. Make sure to uncheck “Copy items if needed” and all targets under “Add to targets”.
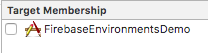
If you accidentally add either of the GoogleService-Info.plist to your target, you can open up the Utilities Panel (right side) and uncheck the files from any targets that may be in there:
When all is said and done, your Xcode project structure should look something like this:

You
may be wondering why the GoogleService-Info.plist files aren’t being
added to the app target. Indeed, they do need to be present in the final
app bundle so that the Firebase SDK instance can be configured
correctly. When the files are part of the app target, this happens
automatically. However, because both files are named the same, we
wouldn’t want both of them to automatically be copied into the app
bundle. Instead, we’ll copy the files manually using an Xcode Run Script
Build Phase:
10. In the Xcode project navigator, select the app target. Switch to the Build Phases tab at the top, then add a New Run Script Phase.
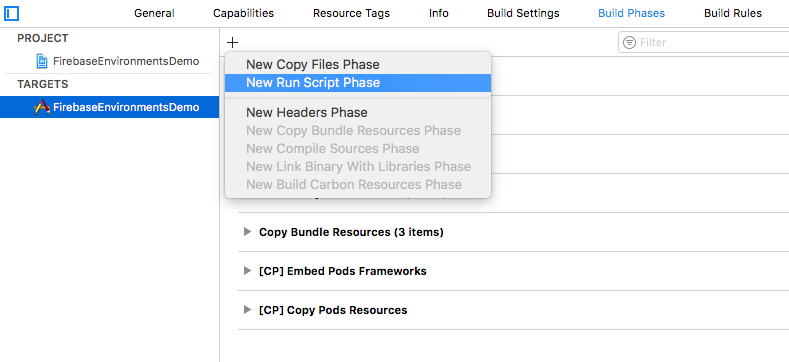
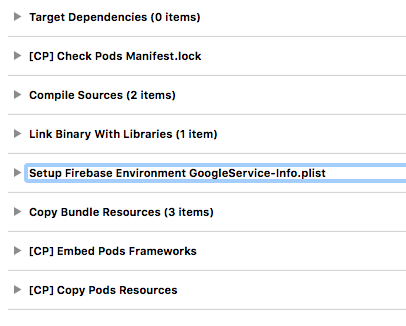
11. Name the phase “Setup Firebase Environment GoogleService-Info.plist”, or something to that effect, and place it after the Link Binary with Libraries step.
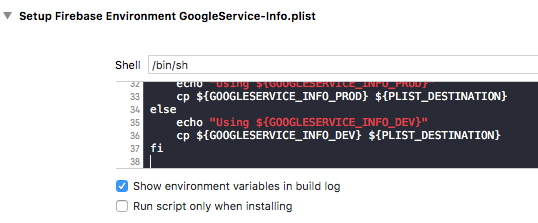
12. Implement a shell script that will copy the appropriate GoogleService-Info.plist
into the app bundle based on the build configuration. Copy and paste
the following shell script into the run script phase you just created:
You
may need to tweak the script for your own project. The script assumes
that you have the default “Debug” and “Release” configurations in your
project. The production GoogleService-Info.plist will be used for “Release” builds and the development GoogleService-Info.plist will be used for all other build configurations.
13. Follow the Firebase SDK setup instructions to add the Firebase SDK to your project if it’s not already been added. Skip the step to add the GoogleService-Info.plist to your project since you’ve already done that. Also, don’t forget to initialize the SDK in your AppDelegate application:didFinishLaunchingWithOptions: method.

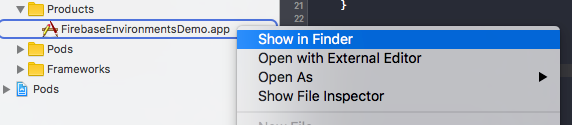
14. Check to make sure everything works properly:
Build your app and ensure the build process finishes without any errors. Then, right-click on the .app file in the Products group in Xcode and select Show in Finder:
Then, in Finder, right-click the .app file and select Show Package Contents:
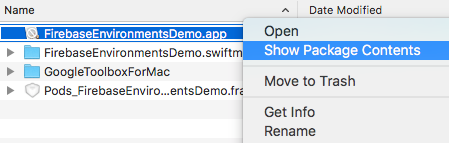
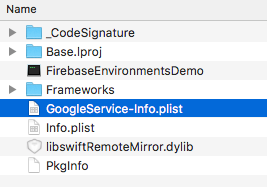
If all went well, you should see a GoogleService-Info.plist. Open it up and verify that the values match that of your development GoogleService-Info.plist.
Next, perform some final validation to make sure your production GoogleService-Info.plist will be used for “Release” build configurations. Change your Run scheme to “Release” and build your app again.

Crack open the .app again and verify that the GoogleService-Info.plist matches your production version. At this point, you should be good to go. Don’t forget to change your Run scheme back to “Debug” before you actually run your app and continue development.
Conclusion
That’s it! Your Xcode project is now configured to swap out your GoogleService-Info.plist
based on build configuration. This will keep all of your development
and production Firebase Analytics data separate so that you won’t have
to worry about polluting your production analytics data when developing
or testing debug versions of your app.
If you’d like to see all of the pieces in action, a fully configured sample project is available on GitHub. The latest version of the shell script used to selectively copy the GoogleService-Info.plist is also available as a GitHub Gist. At the time of writing, the following tools were used to generate this guide:
- Xcode 8.3.3
- Cocoapods 1.3.0.beta.2
- Firebase iOS SDK 4.0.3


No comments: